
[Main Window Dialog] [Pine Assign Dialog] [Probable Assign Dialog]
* Main Window Dialog
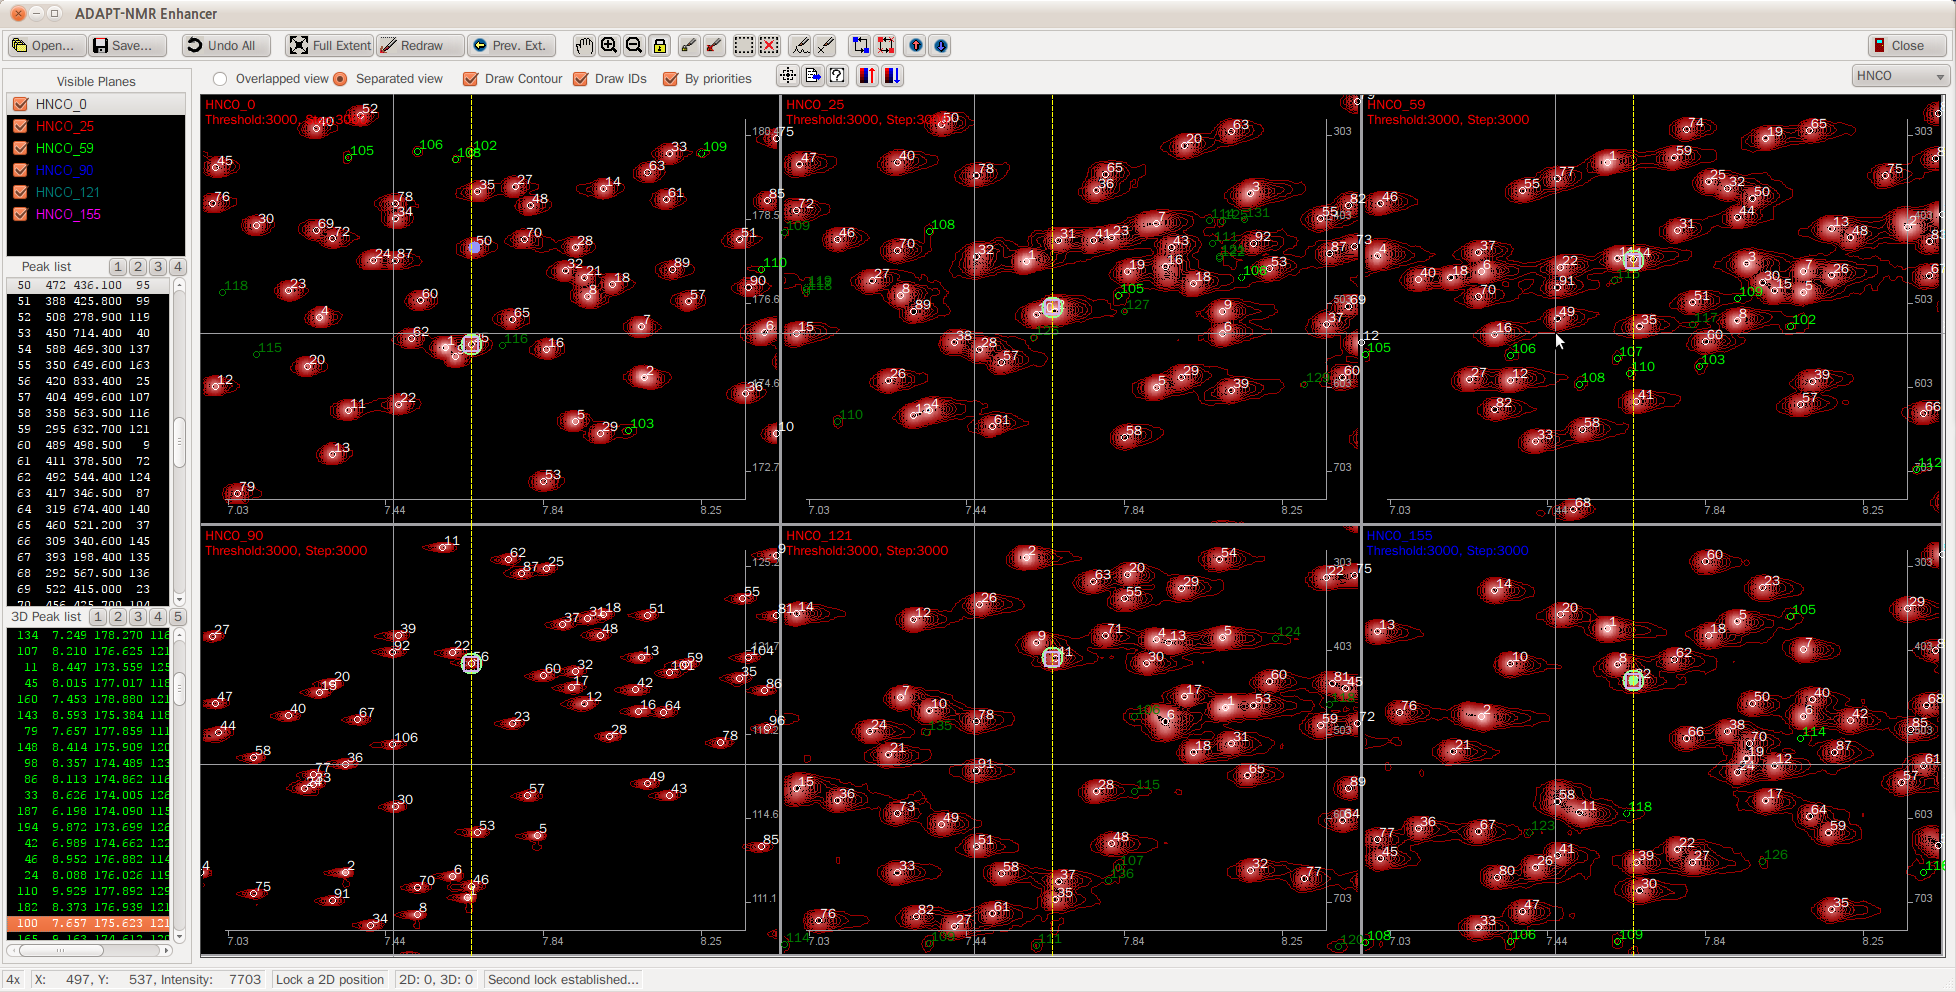
The main window is where you can see visually plotted 2D tilt planes along with orthogonal planes. Tool buttons for visual management and peak management are located on the top. Left hand side is place for list boxes- tilt planes, 2D peak list and 3D peak list. You can see 6 tilt planes max at once in the main screen. You can find relative 2D positions depending on tilt angles in the screen helping you the quality of the 3D peak construction by ADAPT-NMR.
Left-side

The list box at the top-left is showing currently visualized planes. You can check six at once to see in the screen. The label shows the experiment type and the tilt angle. For example, HNCO_59 means 59 degree tilt plane of HNCO. Sometimes the selection of the plane is vital to do some plane specific functions. If you want to change the contour level of 59 degree plane for better resolution, you should select the plane from here.
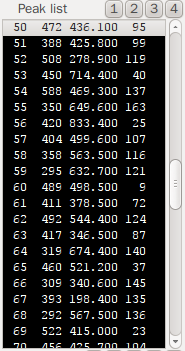
2D peaks are listed in the list box. The column indicates; 2D peak index, X position, Y position, 3D peak index. X, Y positions are in pixel units, but they are refined under a pixel by interpolation. 3D peak index indicates the constructed 3D peak linked to the 2D peak. If the 3D peak index is zero (0), it means the 2D peak is not linked to any contructed 3D peak. In that case, user should look carefully to judge whether the peak is noise or not. If user select a peak in the list, the peak will be highlighted purple in the screen. The numbers- 1,2,3,4- are actually buttons for sorting. If user clicks 1 button, the list will be sorted by the first column which is peak index. The color of the peak in the list box indicates the priority- white, the highest, green, the next, dark green, the next... Higher priority means that the peak is confidently picked, so it will be strongly used for 3D peak construction. You can change the priority by the icons introduced later.

3D peaks constructed by ADAPT-NMR are listed in the list box. The column indicates; 3D peak index, direct dimension chemical shift, primary indirect dimension chemical shift, secondary indirect dimension chemical shift, probability. The probability implies the confidence of 3D peak construction. User can select a 3D peak from this list box. When a 3D peak is selected, the 2D tilt peaks linked to (used to construct) the 3D peak in every tilt planes will be highlighted lime in the screen. The numbers- 1,2,3,4,5- are also sorting buttons just same as the 2D peak list box above. The color of the 3D peak in the list box indicates how ADAPT-NMR confidently constructed that 3D peak out of 2D tilt peaks. The color indicator is like this. White: >90%, green: >70%, dark green: > 50%, red: <50%. Also, if a 3D peak does not have any linked 2D tilt peaks, the background color of the peak is blue (because the peak is lonely and blue!).
Top panels

ADAPT-NMR Enhancer works in the ADAPT-NMR working directory. As the ADAPT-NMR sub-directories and files are formatted, open and save functions are made for getting working directory from users. However, the formatted structures between Varian (Agilent) version and Bruker version are different, so that user should let the ADAPT-NMR Enhancer knows what spectrometer was used for collecting data. You will see the radio buttons to select the spectrometer in the Open Dialog section. ADAPT-NMR Enhancer also provides a functionality to make the project the initial stage just after ADAPT-NMR run in the case of unreturnable fault by users. The undo all recover everything. The following is the Open Dialog. You can see the radio buttons for selecting spectrometer types.


Full extent will change your viewport to cover whole spectrum range. So you will see every contents from the spectrum. This is useful when you are seeing very zoomed specific area in the spectrum and you need to quickly move to totally diferent place in the spectrum. In that case, you can click this button and zoom in to the place of your interest. Redraw button is for some accidental plotting miss by ADAPT-NMR Enhancer or other reasons. If you click this buttons, the extent will be kept but drawing will be made again. Previous extent is for going back to your previous extent. When you accidentally changed your viewport, or you just want to see the previous work in the different viewport, you can just click this button to go back.

Five mouse cursor mode icons are here- pan, zoom in, zoom out, lock and add a 2D peak. The last icon is delete a selected 2D peak. Those mouse cursor mode will take an effect when you click on the screen. For example, let say you are in zoom in mode. If you want to see a certain peak on the screen more in detail, click on the peak. Then the peak will be drawn bigger and centered. The lock mode requires clicking twice on different spectra. If you select two places in different tilt planes, the calculated 3D place will be circled in all visible tilt planes. This is useful when you want to decide 3D peak construction. If there is a peak and the peak is not linked to any of 3D peaks in the list (which means 3D peak index column is zero), you click on the peak with the mouse mode. Then, you will see yellow dotted lines on the spectra. The yellow dotted lines are on the same position in direct dimension. If you click on the suspicious linked 2D peak from the other spectra after that, ADAPT-NMR Enhancer will calculate 3D peak position using those two 2D peaks. The projected positions to 2D tilt planes from the constructed 3D peak will be rectangled with purple lines in every 2D tilt planes. By these repeats, you can complete lacking 3D peak construction from 2D tilt peaks.

First two buttons are select and deselect icons. The select button is another mouse cursor mode. If you are in that mode, you can drag a rectangle on a certain place to select a peak in the screen. You can either select a 2D peak and a constructed 3D peak linked to a 2D peak in the your dragged rectagle. Right-button-drag will bring you a 2D peak selection while left-button-drag will bring you a 3D peak selection. If you want to deselect, you can click the deselect icon or drag on the empty space in the screen. Third and fourth icons are adding a peak and deleting a peak. Adding a peak is another mouse cursor mode. If you click on the screen, a 2D tilt peak will be created. This function is useful when ADAPT-NMR initially could not pick a peak due to some reasons such as overlap, shoulder peak, etc. If a noise peak is picked by ADAPT-NMR, deleting a peak icon can be useful. The function is not a mouse cursor mode, and it deletes a peak which is currently selected.

First two buttons are related to linking functions. A 2D peak which is not linked to any of 3D peaks will has a value of zero at the last column in the 2D peak list, which means there no related constructed 3D peak in the list. However, if you could figure out the peak should came from a certain 3D peak, you can make it linked to the 3D peak by clicking the first button. Otherwise, a 2D peak which is miss-linked to some 3D peak can be unlinked, too.

ADAPT-NMR Enhancer offers two viewing methods. One is overlaped view, which shows all selected tilt planes in the same screen, and the separated view shows 6 tilt planes in divided screens. The overlapped view is good to see the linked 2D tilt peaks for the 3D peak quickly- how they should be located and picked. But other functions related to the actual peak modifications and validations will be done mostly in the separated view.

If Draw Contour is not checked, contoured level of spectra will not be drawn. All you will see are circled peaks. The contour requires 4x or more zoom in scale. The 2D peak index will be drawn if Draw IDs is checked. Likewise, the peak circle color will not always be white if you check By priorities. The color will be the priority indicating color same as in the 2D peak list.

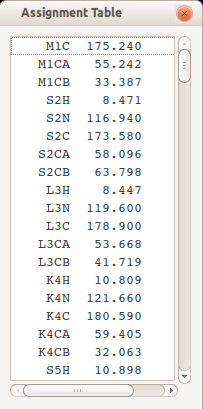
The first icon is Assignment Table. If you click the button, you will see the dialog showing current assignment status.
Second icon is adding a horizontal line by a chemical shift value of 2nd indirect dimension(13C). This is useful especially when you are doing assignment by yourself in the ADAPT-NMR Enhancer because you might want to find matching C(i) to weave H(i)-N(i) and H(i-1)-N(i-1) pieces for assignment walking strategy.
Third icon is export. Many formats are supported by ADAPT-NMR Enhancer; XEASY Prot, PINE pre-assignment, PINE probabilistic output, TALOS+ input. The export dialog will require base threshold of probability. You can manually set up the minimal probability to include the confident assignments by ADAPT-NMR. Assignment made by user will basically be considered as 1.0 probability.
The last icon is for changing probability manually for the selected 3D peak. If you are very sure about the constructed peak which has low probability, you can change it by yourself.

These two icons are for contour levels. You can lower or higher the contour level for getting rid of noise peaks or showing weak peaks.This function works for individual tilt plane. So you need to select a 2D tilt plane from the plane list box at the left.

You can move from an experiment to the other experiment by changing in this drop down list box.

At the bottom, there is a status bar shows useful information. You can see current zoom scale, cursor position, intensity on the cursor, mouse cursor mode, peak count, and current ADAPT-NMR Enhancer status.
* Pine Assignment Dialog
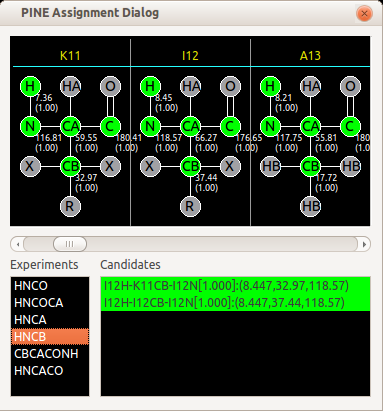
Pine Assignment Dialog is a similar to the Pine Graph Assigner from PINE-SPARKY supporting atom-by-atom assignment. You can see the assignment and probability on the residues. The atom color indicates the probability visually. The legend is just same as PINE overall picture. Green: >99%, cyan: 85%-99%, yellow: 50%-85%, red: less than 50%, grey: no assignment.
If you click on the experiment, the visible 3D peaks predicted by using the assignment will be shown in the candidate list box. You can double-click on the one of the candidates, then ADAPT-NMR Enhancer tries to find the peak at the position and select. If there is no peak at the place, it will ask you to create the peak on the position.
* Probable Assignment Dialog
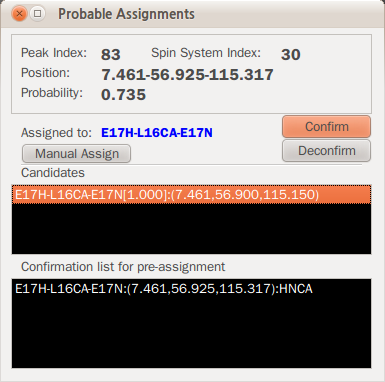
Probable Assignment Dialog is similar to the Pine Assigner from PINE-SPARKY supporting peak-by-peak assignment. When user selects a constructed 3D peak, this dialog automatically pops up. It shows what probable assignment candidates are available for this peak based on assignment table given by ADAPT-NMR. User can double click on a candidate from the candidate list to confirm it. Also, user can manually assign a peak if there is no proper candidate offered in the dialog. By clicking Confirm button, you can give 100% probability to the assignment. The confirmation is necesary to include your assignment to the exported file afterward.
* Keyboard shortcuts
[F1] Pan
[F2] Zoom in
[F3] Zoom out
[F4] Lock
[F5] Add 3D peak by current lock
[F6] Select by rect
[F7] Add a new peak
[F8] Link a selected peak
[F9] Unlink a selected peak
[Del] Delete an existing peak
[o] Open...
[s] Save...
[u] Undo All
[q] Exit program
[f] Zoom to full extent
[r] Redraw screen
[<] Zoom to previous extent
[^] Increase a priority level of a selected peak
[v] Decrease a priority level of a selected peak
[i] Increase color level.
[d] Decrease color level.
[e] Export assignmnets
// Not yet implemented
[+] Zoom in *2
[-] Zoom out /2