
The PINE server uses a probabilistic approach to determine the atomic origin of each peak in the spectrum. Because PINE generates multiple possible assignments for one peak and calculates probabilities, the user must choose one of them. Our “PINE-SPARKY” project is designed for those who wants to quickly and easily assign peaks based upon PINE outputs. “PINE-SPARKY” consists of three extensions - “PINE Assigner”, “PINE Graph Assigner” and “Assign the best by PINE”.
We selected SPARKY as a viewing and assigning tool for PINE-SPARKY because currently SPARKY is the most popular NMR assignment program according to information coming from BMRB depositions. Our extensions for SPARKY have simple, user-friendly interfaces and will shorten your assignment time with simple and powerful functions.
Check out our new SPARKY extensions.
The following are brief introductions to the PINE-SPARKY extensions.
The SPARKY extension, “PINE Assigner”, is a dialog that lists all possible assignments that were included in the PINE2SPARKY converter for one selected peak. To select the most likely assignment, the user clicks on the desired label in the list.
To open the “PINE Assigner”, users can either type “pr” or click on the “PINE Assigner” menu in the extension tab.
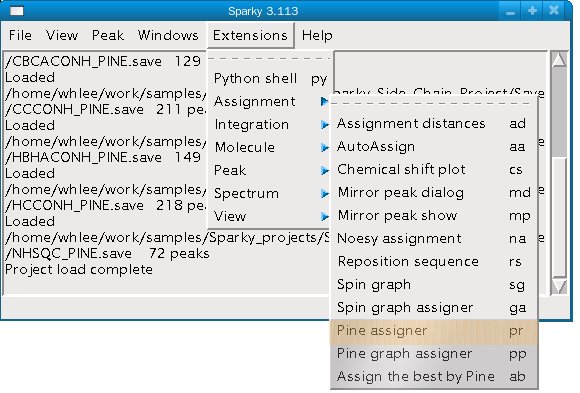
You can view the “PINE Assigner” dialog box by clicking on located under the extension tab of the menu. Be sure that you select just one peak from the selected spectrum. If you do not select a peak, “PINE Assigner” will close immediately. If you select one peak and type “pr” or select from the menu, then you will see a dialog window like following.
In the "PINE Assigner", there are labels, a list box and some buttons that simplify the assignment selection process. The labels “Selected Spectrum” and “Selected Peak” indicate which spectrum or peak is currently selected. Possible assignments for the selected peak in the selected spectrum are listed in the list box located under the label “Choose possible resonance assignments by PINE”. There are buttons under the list box which are labeled with their function. These buttons are described below:
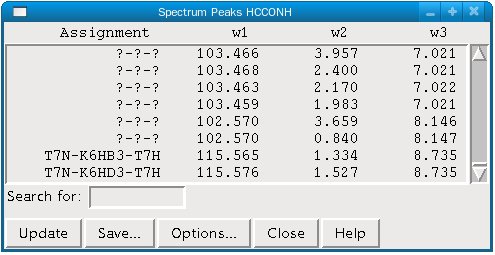
We recommend you use “PINE Assigner” and “Peak List” dialog together. Typing the “lt” command will bring up the “Peak List” dialog box and you can select a peak in the "Peak List" by double-clicking on the desired peak. Then, type “pr” or select “PINE Assigner” from the extension tab to open the “PINE Assigner” window.
If "PINE Assigner" is already open, click the "Update" button.

As you can see, the multiple labels generated by PINE2SPARKY have different colors. You can try “PINE Assigner” to assign with one of them.

Assign the selected peak according to both spectrum view and probabilities in the “PINE Assigner”.
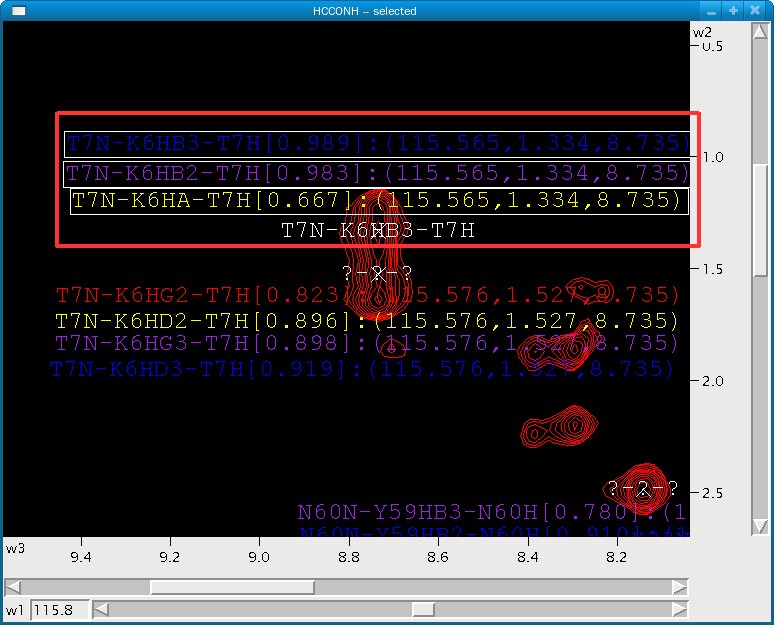
Once the assignment is performed, the default “?-?-?” label attached to the selected peak will be changed to the assignment and the floating labels will be selected. You can remove them by pressing “Delete” key.
New assignment will also be seen in “Peak List” dialog box.

Double-click on another peak of the “Peak List” dialog to select and assign. Then click the “Update” button in the “PINE Assigner”. You can assign the newly selected peak as you did for previous one. Repeat this process until the entire spectrum has been assigned.
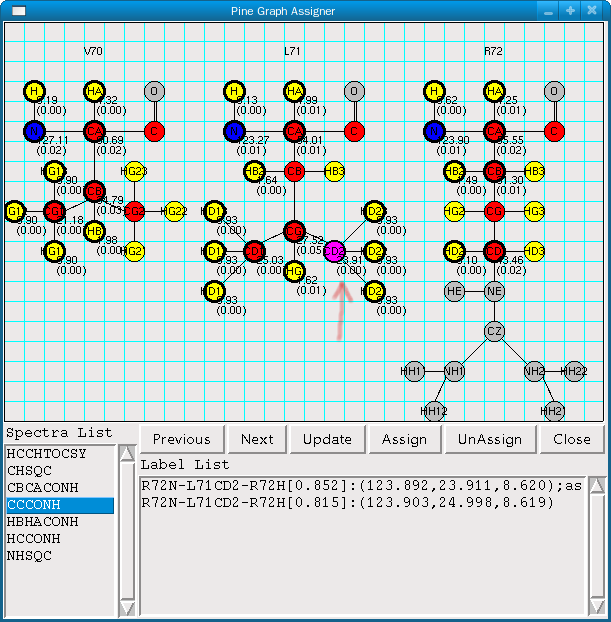
“PINE Graph Assigner” is a graphical diagram window that displays all the atoms from the selected residue as well as the atoms in the residues adjacent to it. The window also contains a list of the NMR experiments PINE used for the assignment. When one selects an individual atom from the structure and a spectrum, “PINE Graph Assigner” displays a ranked list of PINE-derived connectivity assignments to that atom from that spectrum. One can assign or unassign one or multiple peaks by a few clicks.
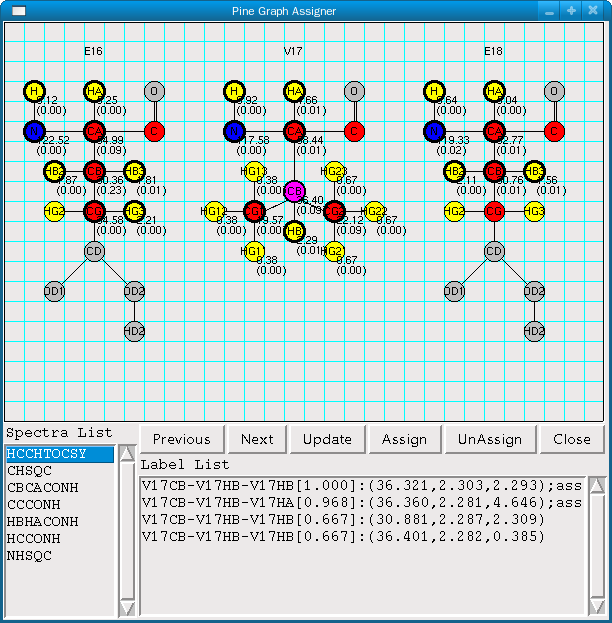
“PINE Graph Assigner” consists of four parts – graphical diagram, spectra list, buttons and label list.
First, from the spectrum a peak you want to assign. Since “PINE Graph Assigner” works atom by atom rather than peak by peak, PINE Graph will recognize which residue is selected not which peak.
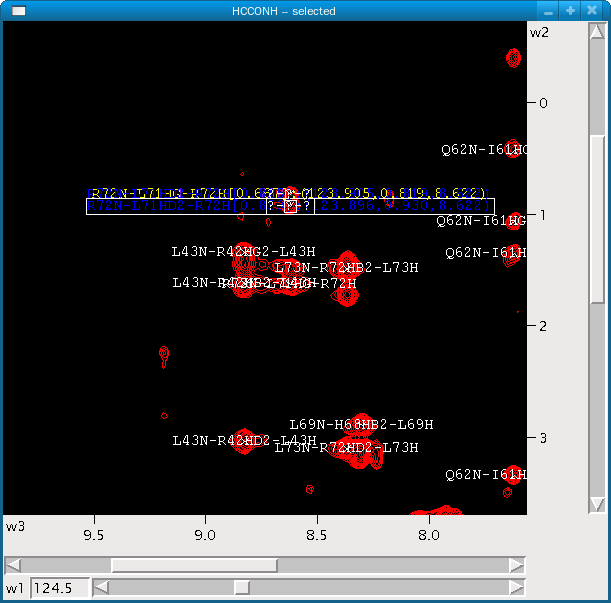
We selected Ubiquitin(76 a.a) to test and "L71HD2” of the protein will be the example we are going to assign in this dialog.
First open up “PINE Graph Assigner”.

There three ways to open up the dialog: 1) clicking the menu item from the “Extension” tab, 2) clicking the “Graph...” button from “PINE Assigner”, or 3) typing “pp”.
When “PINE Graph Assigner” opens up, the residue of the first axis of the selected label and “CA” will be selected in the diagram. In the example, we selected the HC(CO)NH spectrum which shows protons from the previous residue (n-1) rather than the chosen residue (n). Therefore to assign the "HD2" atom from L71, we have to move to residue L71 by pressingthe "Previous" button one time.

In this case, the atoms we want to assign are located in the previous residue. Therefore we must click the "Previous” button to selecting “HD22”. You can not select the desired atom before you move to the residue because selected atom will automatically be changed to “CA” when you press the “Previous” or “Next” button. Since not every atom type exists in all amino acids, the selected atom is automatically changed to “CA” when residue selection is changed.

The selected atom “HD22” is purple which means it is the atom that has been selected, and the labels related to both the atom and the spectrum are listed in the label list box. Labels are sorted by probability and first label showing the highest probability is selected. Clicking the “Assign” button will assign the selected label to the selected atom. To remove floating labels, press the “Delete” key. You can check this assignment by double-clicking the label and viewing the spectrum.

The label “R72N-L71HD2-R72H” selected in the label list box is assigned properly as shown above. Chemical shifts and deviations are displayed in the diagram with automatically analyzed pseudo atoms.

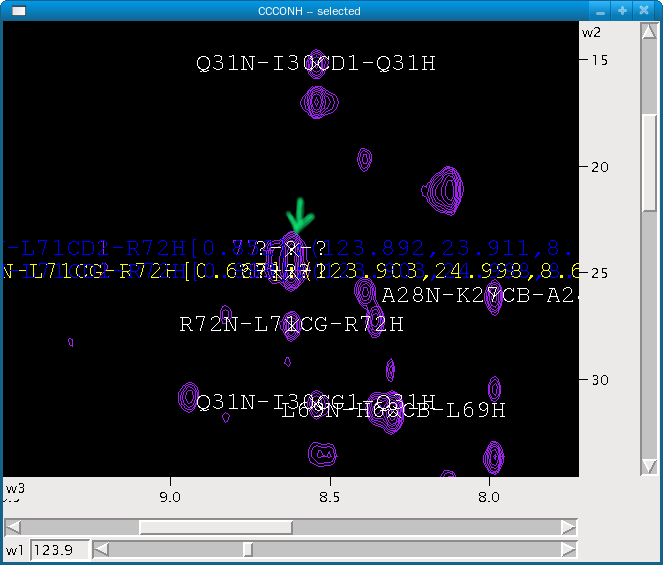
As you can see, assigning one atom can be done very quickly. To assign more, proceed to the following steps: You can see “CD2” which is not assigned yet according to the above diagram. Select “CD2” by clicking on it in graphical diagram and select the “CC(CO)NH” spectrum by clicking on it in the spectra list box. Then you will see available labels in the label list box like following:

To check which label is the correct one, you can double-click the label.
After deciding which one to assign, click the “Assign” button and press the “Delete” key. The spectrum view should look like this.

Once you assign the next atom using this simple and fast process, you will see applied chemical shifts and deviations in the graphical diagram like following.
By performing these steps iteratively, you can assign the entire protein quickly and easily. “PINE Graph Assigner” allows you to reduce the time it takes to assign a protein by providing a label list that you can simply click on and by allowing you skip atoms that have already been assigned in other spectra.
When you use “PINE Assigner” to assign a peak, you maybe select the assignment with the highest probability. Certainly this is faster than assigning every peak by selecting and assigning peaks one-by-one the spectrum view. However if you want to automatically assign all of the residues in a peak with the labels that have the highest probability, you can use the “Assign the best by PINE” extension.
“Assign the best by PINE” performs assignment with the highest probability for all of the residues represented in a peak. You can set a minimal threshold for probability and the function will only assign peaks that have higher probabilities than the minimal threshold. This function will help you to save time by reducing repetitive jobs.
Usage is really simple for “Assign the best by PINE”.
First, you must select a spectrum that you want to assign by clicking on it. Then the spectrum will be focused and “- selected” text will be appeared on the window border like following.

Second, you can execute the function “Assign the best by PINE” by typing “ab” or selecting it in the menu from “Extensions” tab.

Third, type minimal threshold from 0.0 to 1.0. The default is 0.9. Finally click “Assign” button.

Wait until the assignment process is finished. You will see assigned peaks and selected floating labels like following.

You can remove floating labels by pressing the “Delete” key.

Remaining PINE labels mean that peaks are not assigned because they do not have PINE labels or the probabilities of their best PINE labels are below the set threshold. Select the peak and execute “PINE Assigner” or “PINE Graph Assigner” to refine more.